How to make your clothes look worn without a model or a mannequin
Photograph the garment on its own — flat, on a hanger or on a dress form — and Tryly returns the ghost mannequin shot: the piece holding a worn human shape, with no body, no mannequin and no hanger in the frame. Tryly aims to preserve the garment’s colour, design and details; inspect the finished image before publishing. You choose up to eight camera angles per garment, one credit per photo, and the first ten photos are free.
It works on t-shirts, shirts, hoodies, jackets, knitwear, dresses and trousers, and the shot it makes is the one most clothing listings use.
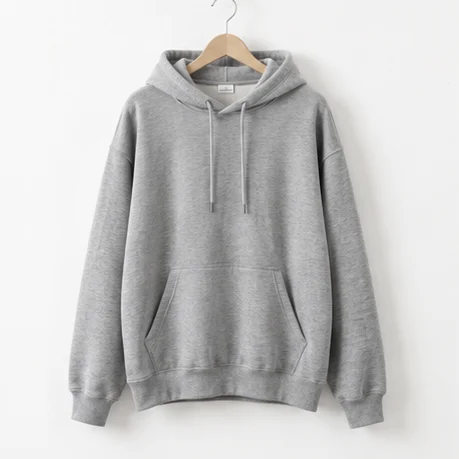
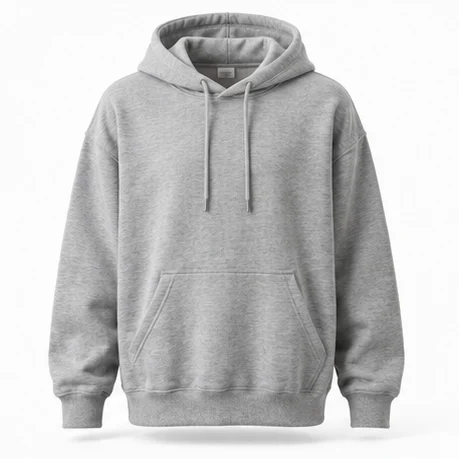
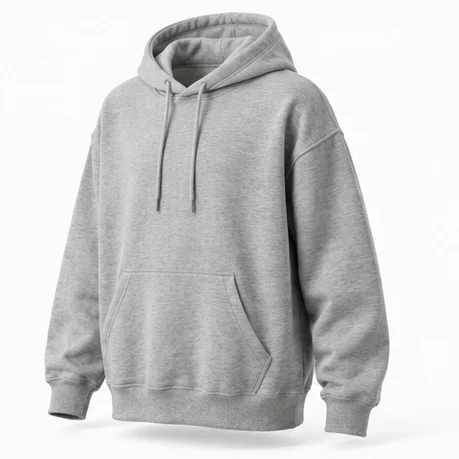
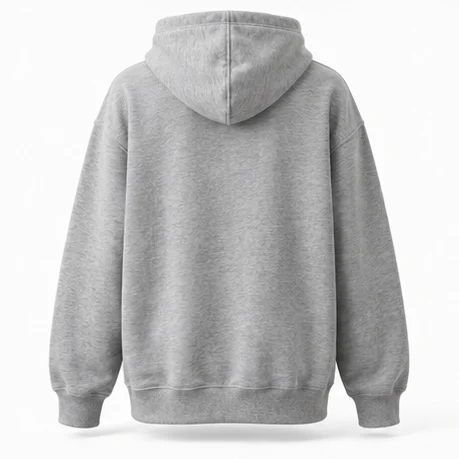
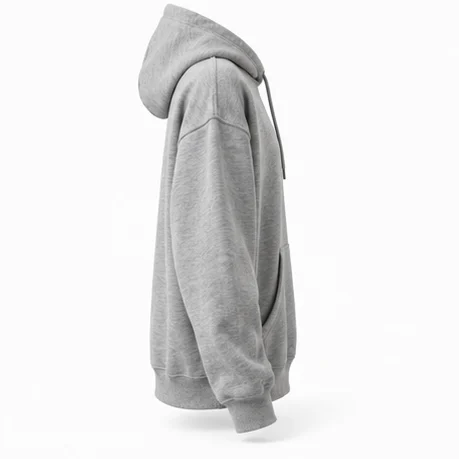
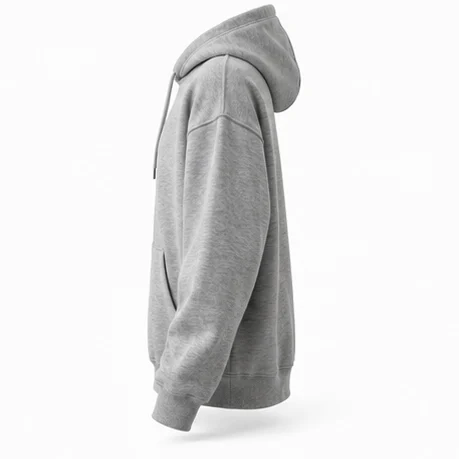
A front photo alone does not unlock every angle: in the app, Back View needs a back upload, and Right Side and Left Side need the matching side uploads. A front photo unlocks Front View and the two 3/4 Front views.
What a ghost mannequin photo is
A garment photographed as if someone is wearing it, with the person removed. The shoulders sit at human width, the collar is open, the sleeves have arms inside them — and there is no body, no skin, no dress form and no hanger anywhere in the picture.
The same shot goes by several names. Ghost mannequin and invisible mannequin are the common ones; hollow man is the older UK trade term. Buyers and suppliers also just call it the worn look. They all mean one thing: the garment holds a three-dimensional human shape without a human in it.
Done the traditional way it is a compositing job. You dress a mannequin, take the main shot, take a second shot of the inside back of the collar, then cut the mannequin out and stitch the collar in so the neck joint reads as a filled, hollow opening rather than a hole. That neck joint is the part that takes the retoucher’s time, and the part that looks wrong when it is rushed.
Tryly does not composite anything, so there is no neck joint to patch and no mannequin to erase. The worn shape is generated from your flat photo directly. What you need is one decent picture of the garment on its own.
How it works, step by step
Upload the garment photo, say whether it is a top, a bottom or a full outfit, pick your angles, pick a background, and generate. Four steps, and each angle you tick is one photo and one credit.
- Upload the garment. There are four slots — Front, Back, Left Side and Right Side. One photo is enough to start, and the front view is the usual one. The source can be a flat-lay, a hanger shot, a dress-form shot or a photo of the piece on a person; whatever is holding the garment gets ignored.
- Say what the piece is. Full Outfit, Top or Bottom. This decides which body shape fills the garment — shoulders, chest and torso for a top; waist, hips and legs for a bottom; shoulders through hem for a full outfit — and which set of eight angles you can choose from.
- Choose your angles. Between one and eight. Angles unlock against the views you uploaded, so a front-only upload offers you Front and the two 3/4 Front views.
- Choose a background. Pick from the preset library, save favourites, or upload your own. A plain studio background gets neutral, even lighting that holds the garment’s true colours; a scene background gets lighting matched to the scene.
- Review and generate. The review step shows every choice before anything is spent, and tells you the credit cost. Behind the scenes the garment is cut out of its background first, then each angle is generated as its own 2K photo.
- Check and download. Finished photos land in your gallery. Open one, look at the collar, the print and the hem up close, and download it — or regenerate that angle if it did not hold.
Which angles you get
Eight per garment type: Front, Back, Left Side, Right Side, and four 3/4 views. Which ones you can select depends on which views you uploaded — the back shot needs a back photo, the side shots need that side’s photo.
| Angle | What it shows | Upload needed first |
|---|---|---|
| Front View | Neckline, chest, both sleeves, hem | Front |
| Back View | Back yoke, centre seam, rear hem | Back |
| Right Side | Right sleeve head-on, side seam, drape | Right |
| Left Side | Left sleeve head-on, side seam, drape | Left |
| 3/4 Front Right | Chest volume and depth, right shoulder forward | Front |
| 3/4 Front Left | Chest volume and depth, left shoulder forward | Front |
| 3/4 Back Right | Right shoulder blade, back yoke with depth | Back |
| 3/4 Back Left | Left shoulder blade, back yoke with depth | Back |
The wording above describes a top. Bottoms and full outfits get the same eight angles with the detail that matters for them: a bottom’s side views show the hip curve and the leg taper, its back views show the seat and back pockets; a full outfit is framed shoulders to ankles in every angle.
This is where the four upload slots earn their place. A front photo alone gives you three selectable angles. A front and a back photo gives you six, and the back shot is built from the real back of the garment rather than inferred — which matters on a jacket with a yoke seam, or trousers with patch pockets.
Which garments it works on
Anything you can lay flat or hang: t-shirts, shirts, blouses, hoodies, jackets, knitwear, dresses, jumpsuits, trousers, jeans, skirts and shorts. You sort them into one of three choices in the app.
| You choose | Which covers | Angles |
|---|---|---|
| Top | T-shirts, shirts, blouses, hoodies, jackets, knitwear and sweaters | 8 — shoulders, chest and torso are filled, sleeves get arm volume |
| Bottom | Trousers, jeans, skirts, shorts, leggings | 8 — waist, hips and legs are filled, waistband and hem stay visible |
| Full Outfit | Dresses, jumpsuits, rompers, gowns, a styled top-and-bottom look | 8 — shoulders through hem in one full-length frame |
Knitwear and hoodies are worth a specific note, because they are the pieces that suffer most on a hanger. A heavy knit collapses inward from a single hanging point and a hoodie’s hood folds flat against the back. Both are reconstructed to a worn shape with the shoulders opened out and the torso filled, which is exactly the difference a shopper reads as “this fits someone”.
If you would rather show the same pieces on a person instead, that is a different mode: the same flat photos can be put on an AI model, and a single garment photo can feed both.
What your input photo needs
One plain, well-lit photo of the garment on its own, with the whole piece in frame. A phone camera is fine. JPG, PNG, WebP, HEIC and HEIF are all accepted, up to 50 MB per image.
Lay it flat, hang it, or put it on a dress form — all three work, and so does a photo of the piece on a person. The garment is cut out of its background before anything is generated, so a plain floor, a white wall or a bedsheet behind it makes that cut cleaner than a busy rail. Nothing should crop off the edge of the frame.
A hanger shot is a normal input and it is handled deliberately rather than tolerated. The instruction is explicit: open the shoulders to natural human width, give the sleeves realistic arm volume instead of letting them hang straight down, fill the torso as if a body is inside, and delete the hanger — hook, bar, clips and clamps — from the output. The instruction is also to preserve the colour, fabric, pattern and construction and change only the shape from hanging to worn. An instruction to preserve is not a guarantee, so inspect the finished image before publishing.
A good source photo of a garment
- The whole garment in frame — collar to hem, cuff to cuff — with nothing cropped.
- Front view first; add the back and each side as their own uploads if you want the back and side angles.
- Buttoned, zipped and smoothed as you sell it; sleeves laid out rather than folded behind.
- A plain background — floor, wall or sheet — that contrasts with the garment, so the cut-out is clean.
- Even light with no hard shadows across the fabric and no flash glare on satin, sequins or leather.
- Prints, logos and labels facing the camera, sharp and in focus.
- Roughly 1024 pixels or more on the shortest edge, so a woven label is not already soft in the input.
On resolution the rule is loose but real. Anything under roughly 1024 pixels on its shortest edge still uploads, but you get a warning — detail the input never captured cannot be invented later, and a soft photo of a woven label comes back as a soft label.
Details to check in your result
Everything that is part of the garment is meant to be preserved. Everything that was holding, hanging or pricing the garment is meant to be removed. Check both in the finished image before you publish.
| In your photo | Intended result | What to check |
|---|---|---|
| Colour, fabric, texture and sheen | Preserve | Compare against the garment in daylight; exact shades can drift |
| Prints, stripes, plaids | Preserve | Scale and placement of the pattern, especially where it meets a seam |
| Printed logos, embroidered text, sewn-in brand labels | Preserve | Every letter, at full size |
| Buttons, zips, seams, pockets, stitching, hardware | Preserve | Count and placement match your photo |
| The fit you shot — loose, oversized, relaxed | Preserve | Oversized still reads oversized; nothing shrink-wrapped to a torso |
| Pleats, quilting, ribbing, lace, gathers, distressing | Preserve | Texture depth and, on sheer fabric, the amount of see-through |
| The hanger, its hook, bar, clips and clamps | Remove | No trace at the shoulders or inside the collar |
| Price tags, hang tags, stickers, barcodes, tag holders, pins | Remove | Nothing left at the neck, cuff or hem |
| The mannequin, dress form, person or table under the garment | Remove | The collar opening reads hollow, with no skin or form edge showing |
| Whatever was behind the garment in your photo | Remove | A clean edge against the new background, with no halo |
The fit row is the one worth reading twice, because it is the usual complaint about AI product shots. The invisible body is there to hold the shape, not to shrink-wrap the garment onto a torso. If the result looks tighter than the garment you shot, regenerate that angle; a retry costs one credit, the same as the first attempt.
Where it struggles
Small text, small logos, sheer fabric, sequins and heavy beading are the details to inspect closely, because the drape has to be built against a body your flat photo never showed.
Printed text first. A slogan across the chest of a t-shirt can come back with a letter reshaped or the spacing off, and the smaller the print, the closer you should look. Small embroidered logos and dense repeating patterns deserve the same look. Read the result up close before you publish anything with words on it.
Fabric that is not opaque next. Chiffon, mesh and lace have to be rendered around a shape that was never photographed, so the drape and the amount of see-through can be wrong. Sequins and heavy beading can flatten. Wrap dresses, asymmetric hems and layered tailoring can come back with the construction subtly altered.
Exact colour is not guaranteed either. A specific brand red or a particular navy can drift between the input and the output, which matters when the same colour has to match across a product page.
None of this makes a garment impossible — it makes it a garment that may take more than one attempt. Every attempt costs a credit, including the ones you throw away. Run your most difficult piece first, on the free photos, and you will know which pieces need a second attempt before you spend anything.
Pricing
One credit is one photo, and each angle you select is one photo. Four angles on one garment costs four credits.
From $0.33 per day. Photos as low as $0.25 each.
$0.33 per day is the Starter plan billed annually — $119.97 a year for 300 photos. $0.25 each is the Max annual 10,000-credit pack, $2,499.99 a year. One credit is one photo.
Billed monthly, Starter is $20 for the default 25-credit pack, $35 for 50 credits or $55 for 100 credits.
10 free photos, no card.
Questions store owners ask
What is a ghost mannequin photo?+
A ghost mannequin photo — also called an invisible mannequin photo, or a hollow man shot in the UK trade — shows a garment holding the shape of a body that is not there. The collar is open, the shoulders are at human width, the sleeves have arms inside them, and there is no person, no dress form and no hanger in the picture. It is the standard product shot on most clothing store listings.
How do I make my clothes look worn without a model or a mannequin?+
Photograph the garment on its own — flat on a table, on a hanger, or on a dress form — upload that photo to Tryly, choose whether it is a top, a bottom or a full outfit, pick the angles you want, and generate. The worn shape is built from your photo. You do not need a model, a mannequin or a photo editor.
Do I need a mannequin to get a ghost mannequin shot?+
No. The traditional method needs one: you shoot the garment on a mannequin, shoot the inside back of the collar separately, and composite the two so the neck joint looks filled. Tryly skips all of that — there is no mannequin to hide and no neck joint to composite, because nothing was shot on a mannequin in the first place.
Can I use a photo of the garment on a hanger?+
Yes, and this is handled explicitly. A hanger shot hangs from one point, so the garment reads narrow and collapsed. The generator is instructed to reconstruct the worn shape — open the shoulders to human width, give the sleeves arm volume, fill the torso — to remove the hanger, hook, bar and clips completely, and to preserve the colour, fabric and construction. An instruction to preserve is not a guarantee, so inspect the finished image before publishing.
Which angles do I get?+
Eight per garment type: Front, Back, Left Side, Right Side, and four 3/4 views (front-left, front-right, back-left, back-right). Which ones you can select depends on what you uploaded — a front photo unlocks Front and both 3/4 Front angles, a back photo unlocks Back and both 3/4 Back angles, and the side views need the matching side photo. You choose between one and eight angles per run.
What is the difference between a ghost mannequin shot and an on-model shot?+
A ghost mannequin shot shows the garment holding a worn shape with nobody in it; an on-model shot shows it on a person. Tryly does both from the same flat photo: this mode makes the ghost mannequin angles, and the on-model modes put the piece on one of 500+ AI models or on your own model. Most listings use the ghost shot as the product image and an on-model shot above it.
What does one photo cost?+
One credit is one photo, and each angle you select is one photo. Choose four angles and you spend four credits. $0.33 per day is the Starter plan billed annually — $119.97 a year for 300 photos. $0.25 each is the Max annual 10,000-credit pack, $2,499.99 a year. One credit is one photo. Billed monthly, Starter is $20 for the default 25-credit pack, $35 for 50 credits or $55 for 100 credits. You get 10 free photos with no card, which is enough to run two garments at four angles each.
What does a traditional ghost mannequin shoot cost?+
Shopify's product photography pricing guide (Shopify Staff, published 27 January 2026, https://www.shopify.com/blog/product-photography-pricing) puts product photographers at $500 to $3,000 per day, with per-image pricing between $50 and $350. Those are general product-photography rates, not ghost-mannequin-specific ones, and the traditional ghost shot adds a mannequin and the neck-joint compositing on top. On Tryly each angle is one credit. There is a worked budget for a whole collection at tryly.ai/blog/true-cost-of-fashion-photoshoots.
What file should I upload?+
An ordinary photo file: JPG, PNG, WebP, HEIC or HEIF, up to 50 MB each. Shoot the garment on its own against a plain background with the whole piece inside the frame. Anything smaller than about 1024 pixels on its shortest edge still uploads, but you are warned that the quality will show.
Do I have to upload all four views?+
No. One photo is enough to start, and the front view is the usual one. Uploading the back, left and right views unlocks the rest of the angles and gives the generator the real back and sides of the garment to work from, instead of inferring them from the front.
What resolution are the photos?+
Ghost mannequin photos come out at 2K. The 4K Ultra Quality option in the app applies to on-model photography, not to this mode.
Can I use the photos on Shopify, and do they meet its image limits?+
Photos made on a paid plan can be used on your store, in ads and on social media. Shopify's own documentation says product images can be any size up to 5000 × 5000 px or 25 megapixels, must have a file size smaller than 20 MB, and that 2048 × 2048 px usually displays best for square product images, with a consistent aspect ratio across your main images (https://help.shopify.com/en/manual/products/product-media/product-media-types, checked 17 September 2026). Check the pixel size of the file you download against that before you upload it. Amazon and Etsy publish their own image rules for sellers; read them in your seller account before you list.
Can I put the garment on a background other than grey?+
Yes. After you pick the angles you choose a background from the preset library, or upload your own. Plain studio backgrounds get neutral, even lighting that shows the garment’s true colours; a scene background gets lighting matched to the scene.
Where does it struggle?+
Small printed text, small logos, sheer fabric, sequins and heavy beading are the details to inspect closely. The drape of a non-opaque fabric has to be built against a body the flat photo never showed, and exact brand colours can drift. Each retry costs a credit, so run your most difficult piece first on the free photos.
Sources
The only outside figures on this page come from the pages below, fetched on the date shown. Product facts come from the app itself.
- Shopify Help Center, "Product media types" — image size limits and the recommended size (checked 17 September 2026)
- Shopify, "Product Photography Pricing Factors: How Much Photos Cost (2026)", Shopify Staff (published 27 January 2026, checked 17 September 2026)
Other things you can photograph this way
The same upload-and-generate flow puts clothing on a model and photographs bags, jewellery, shoes, hats and watches, each with its own angles and poses.
- On-model photography for a whole clothing collectionTen garments on one AI model, flat photo to on-model to close-up.
- The AI clothing model library500+ models to choose from, or upload your own model or yourself.
- Modest fashion and hijab photographyAbayas, hijabs and modest cuts on a model, with the hijab setting explained.
- AI bag photographyHandbags, totes, crossbody bags and backpacks on a model or in an editorial scene.
- AI jewelry photographyNecklaces, earrings, bracelets and rings worn and shot close up.
- AI shoe photographySneakers, heels and boots on foot or as studio angles.
- AI hat photographyCaps, beanies and bucket hats on a model or on their own.
- AI watch photographyWristwatches on a wrist, on a surface, or worn in a scene.
10 free photos, no card. From $0.33 per day. Photos as low as $0.25 each.
$0.33 per day is the Starter plan billed annually — $119.97 a year for 300 photos. $0.25 each is the Max annual 10,000-credit pack, $2,499.99 a year. One credit is one photo.
Try it with your own garment